- Home
- SHOP
-
-
PRODUCT CATEGORY
-
- Akedo
- Ania
- Barbie
- Beast Lab
- Beyblade
- Big Hero 6
- Blast Fighter
- Boboiboy
- Bottleman
- Bumbumz
- Cookeez Makery
- Dart Zone
- Disney
- Dragon Ball
- Goo Jit Zu
- Gundam
- Hatch & Hereos
- Initial-D
- Jazwares
- Jurassic World
- Kamen Rider
- Licca
- Little Live Pets
- Magic Mixies
- Magnetic Board
- Metacolle
-
-
- PROMOTION
-
-
Special Deals
-
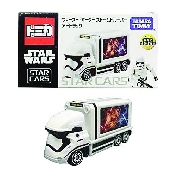
- Takara Tomy Tomica Star Wars SC-05 .. - RM28.00
- Original Barney 12-Inch Rolling Bac.. - RM25.00
- Takara Tomy Tomica Star Wars SC-04 .. - RM28.00
- Takara Tomy Tomica Star Wars SC-01 .. - RM28.00
- Original Barney 12-inch Backpack - RM14.00
- Takara Tomy Tomica Star Wars SC-02 .. - RM28.00
-
-
- CHECK ORDER